In this discussion, I aim to share my insights gained from creating numerous work applications within a unified Angular project. A multi-project application proves highly advantageous for enterprises employing a single repository and global configuration for all their Angular projects. Moreover, it seamlessly facilitates library development. It’s noteworthy that, since version 6 of the Angular CLI, developers can leverage the capability to establish multiple applications within a singular Angular project. This approach streamlines development processes and fosters efficient management across various projects. As an esteemed PowerApps development company, we recognize the significance of such versatile application structures in enhancing overall development efficacy and scalability.
Meanwhile, let’s take an eagle’s look at the features of Angular
Table of Content
- Why Multiple Applications?
- How Multiple applications help you save expenses?
- How Multiple applications help with scalability?
- Projects that Clients Love: How Multi applications Help Business clients?
- Pre-requisites
- Steps to create multiple application in angular
- Create a library along with applications in the same workspace.
- Generate component, service or any file that generated by the CLI
- What is micro service based architecture?
- How to implement micro service based architecture in this project structure?
- Summary
Why Multiple Applications using Angular?
In angular, MonoRepo is a repository structure where we can create multiple applications, libraries in a single repository. This structure increases the code reusability, simplifies dependency management because with single package.json dependencies we can use it in all of the applications in the project and enhances collaborations with teams. Benefits of MonoRepo structure likes below :
1) Simplified Dependency Management: In MonoRepo structure we have a single package.json for all of the workspaces so, we can use the same dependencies with the same versions in all of the workspaces in our project. This eliminates version conflicts and reduces the effort required to update dependencies. Pros of simplified dependency management like below :
- Don’t need to run npm install in all of the applications in the workspace.
- Easily update all the dependencies versions
- Disk space reduced because one node_modules available for all the applications in the project
- Managed project by single git repository
2)Simplified testing and deployment: Testing and deploying code is simplified when all of the code is in a single repository. It is easier to ensure that all changes are thoroughly tested and that all dependencies are up to date.
3)Better Collaborations: UsingMonoRepo structure developers or teams easily understand the code structure and easily collaborate with each other. Teams can easily contribute to and benefit from shared components, leading to increased productivity and faster development cycles.
4)Code Reusability: We can reuse the code by creating the libraries in the project. Those are all the libraries we can use in all the work spaces in our project. This can save time and effort when developing new features or applications.
How do Multiple applications help you save expenses?
Saving money is one of the important key goals when we are planning application development. When we develop any site or application at that time we should check the use of which strategy takes very less expense for developing.
But, how do we save expenses using multiple application structures? It is like that, suppose we will upload our application in any of the platforms like Azure with Azure CICD Pipeline deployment service approach, we don’t need multiple paths to store our multiple applications. Because we are using a single workspace with multiple applications. So, It will create a single build for all of the applications with different folders so, with a single project URL we can open that application build. only we need to pass that project dist name as an endpoint in the route.
The above way is helpful to us to not spend more money to use different containers. Using a single container, we can use all of the projects. So, it is to save expenses.
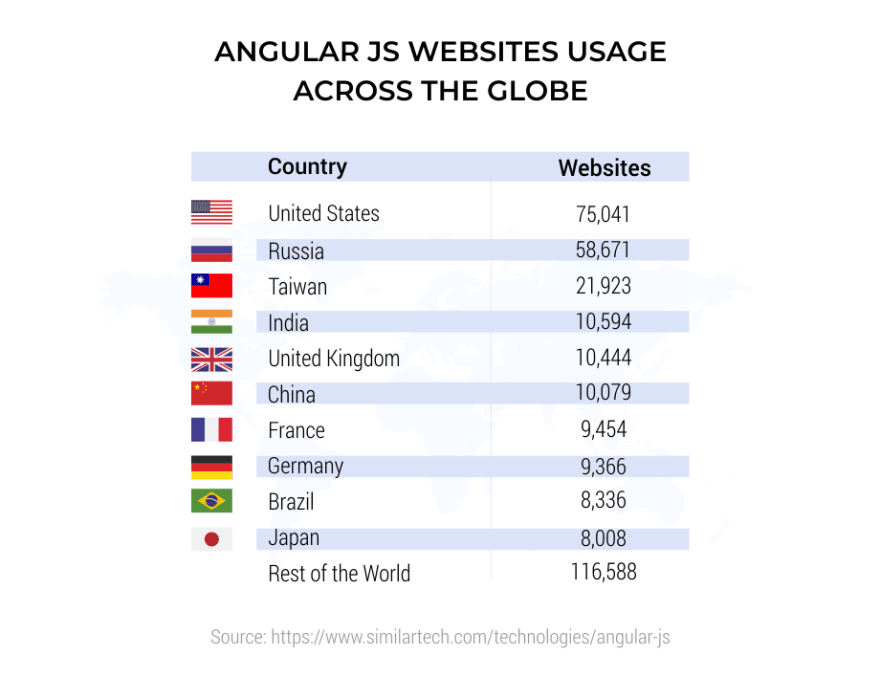
Key statistics of Angular technology
 Scalability refers to an application’s capacity or ability to grow with demand without degrading performance or disrupting the user experience. When you have a scalable application, you can add more resources when needed, which improves your ability to serve customer requests under heavy load, as well as reduce downtime due to server crashes.
One of the points of scalability is Your code should be clean. So, using this multiple application obviously our code will be clean because we are creating our application code differently with its separate project. Where we can also use the same dependencies in all of the projects.
Projects that Clients Love: How Multi Applications Help Business Clients?
From a business standpoint, Angular emerges as the primary preference for developing contemporary single-page applications. This inclination is attributed to Angular’s provision of numerous built-in functionalities, including clear and organized code through TypeScript, an emphasis on consistency and reusability, the availability of its dedicated UI library (Angular Material), and a plethora of frameworks facilitating comprehensive unit testing. For this reason, businesses acknowledge the pivotal role of this platform and tend to hire Angular developers to streamline application development, with ensured code clarity and improved scalability.
But, how does the multi-application architecture help the client? It is like that, using multiple applications with a single workspace is very helpful from a business perspective. Because many of the benefits are available for this type of structure. Like, that multilevel application helps us to manage code and projects with single dependencies. This decreases the bundle size of project dist and is also good for expenses.
The above benefits are the reasons that clients always choose multi-level architecture when he has a requirement to create multiple projects or applications there he need to manage with single dependencies.
Pre-requisites:
Node: For building this multiple application structure angular needs a 10.9.0 or later version of node ( I would suggest updating to the latest version of node ). We can download a node from its official site: nodejs.org. ( We can check node version by node – -version command )
Also, we need a npm package manager. You don’t need to set it differently. Npm setup included with node js setup. ( npm – -version command used to check npm version of system )
Finally, you need to setup angular CLI in your system by below command :
npm install -g @angular/cli
Steps to create multiple application in angular :
Steps to create multiple application in angular :
Steps to create multiple application in angular :
1) Create empty work space :
Steps to create multiple application in angular :First step for creating multiple applications is to create an empty workspace. We can create an empty workspace by ng new <workspace_name> CLI Command. But, to create an empty workspace we need to pass –createApplication=”false” check in the CLI command.

It creates the structure without the app folder in the workspace like below scree-shot with multi-app workspace name that we have passed with a new command.
Steps to create multiple application in angular :
2) Create new application in empty workspace :
Steps to create multiple application in angular :Command for creating a new application is new generate application <application_name>. This command creates a new application in this empty workspace.
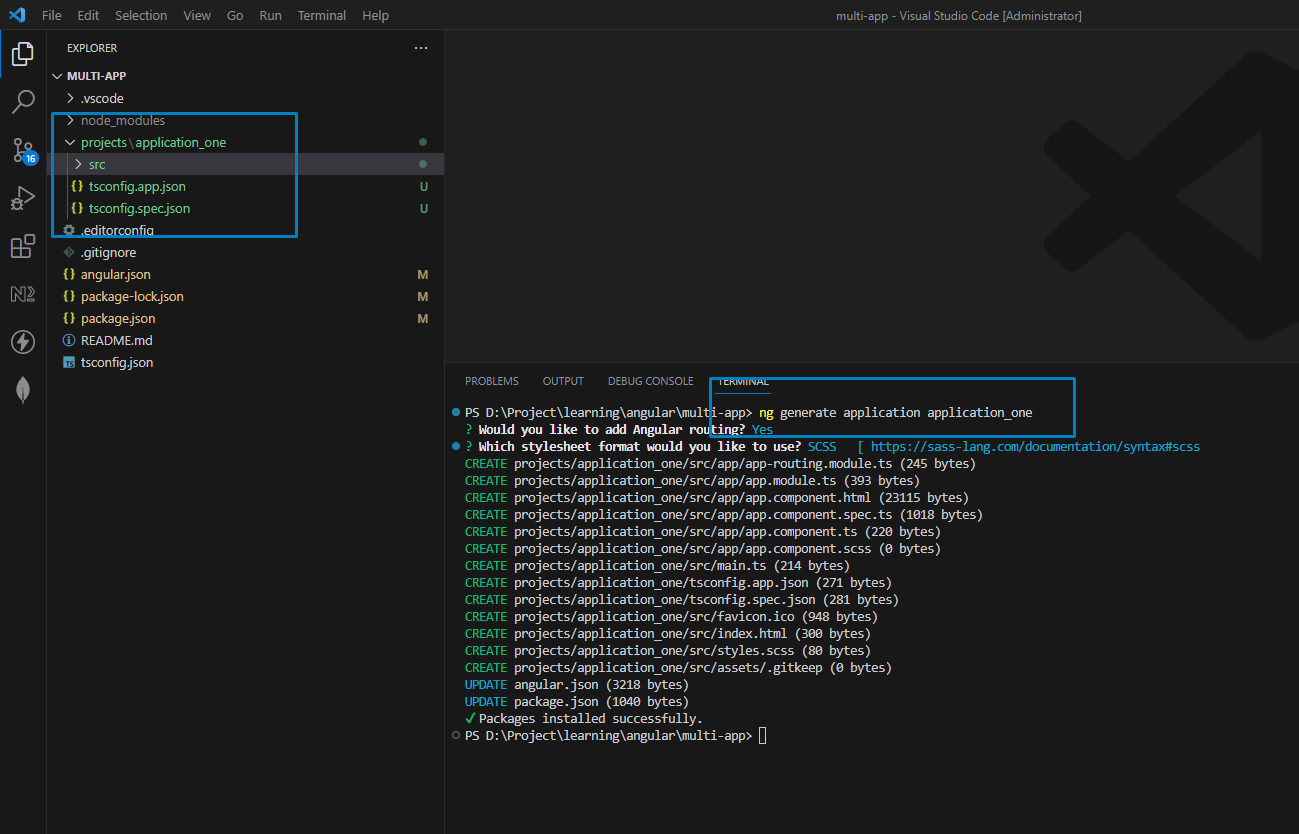
See above screen-shot. I have created a new application. Its name is application_one like the above screen shot.
Steps to create multiple application in angular :
3) Add another application :
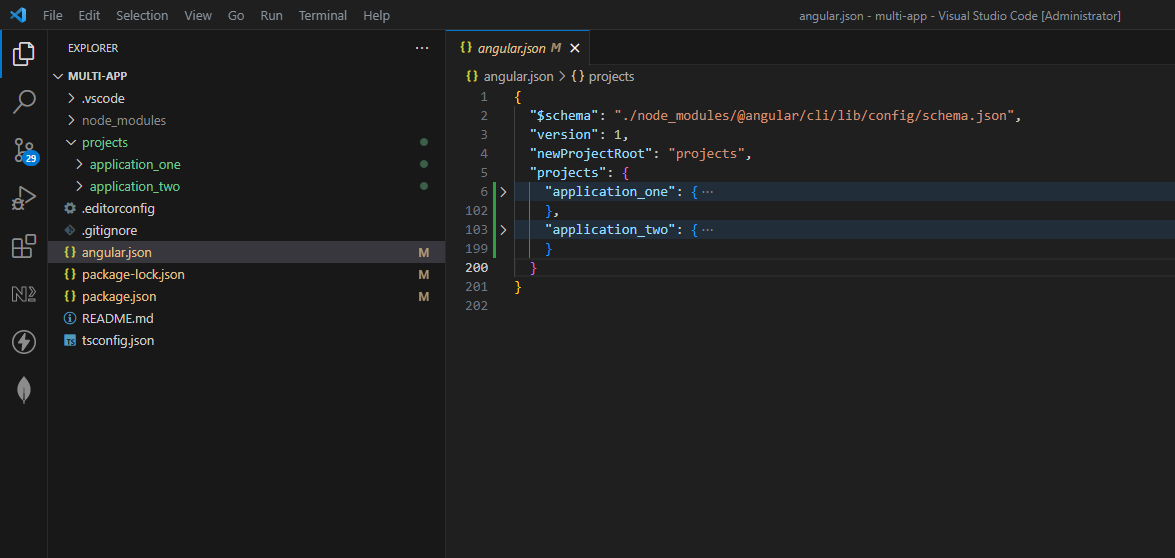
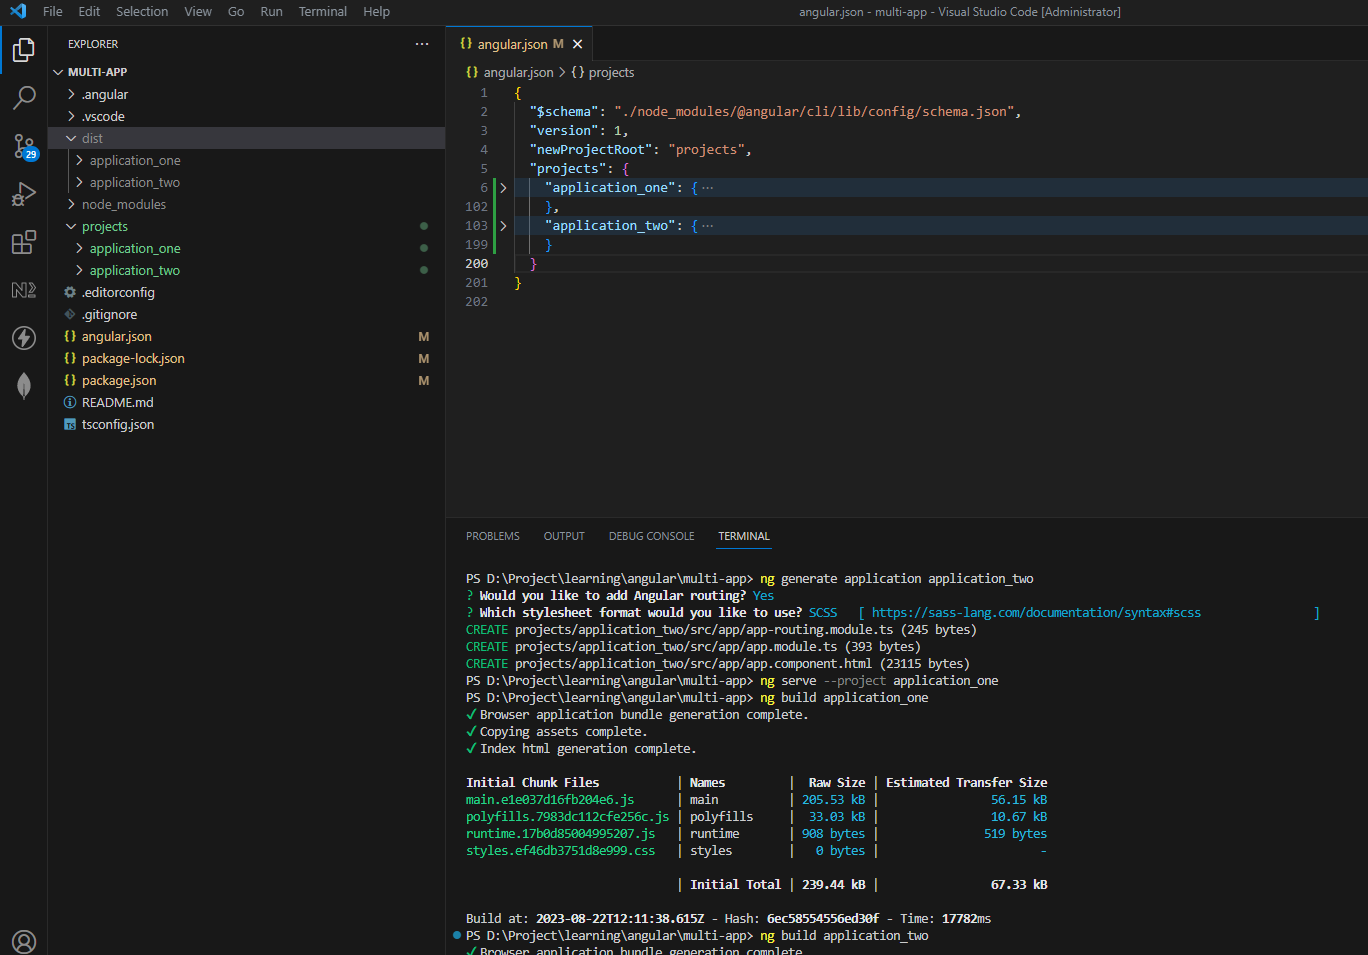
Now, If we need another application then, we can go with next Angular application development using the same command for application generation. All the application configuration will be made inside the angular.json when we create that app using angular CLI command like below screen-shot.
All applications created with different sub_folders inside projects folder. CLI command will create two objects inside the project key for application_one and application_two like below screen-shot. In the project object all the configurations available are the same as single project work directory of angular.
Steps to create multiple application in angular :Steps to create multiple application in angular :
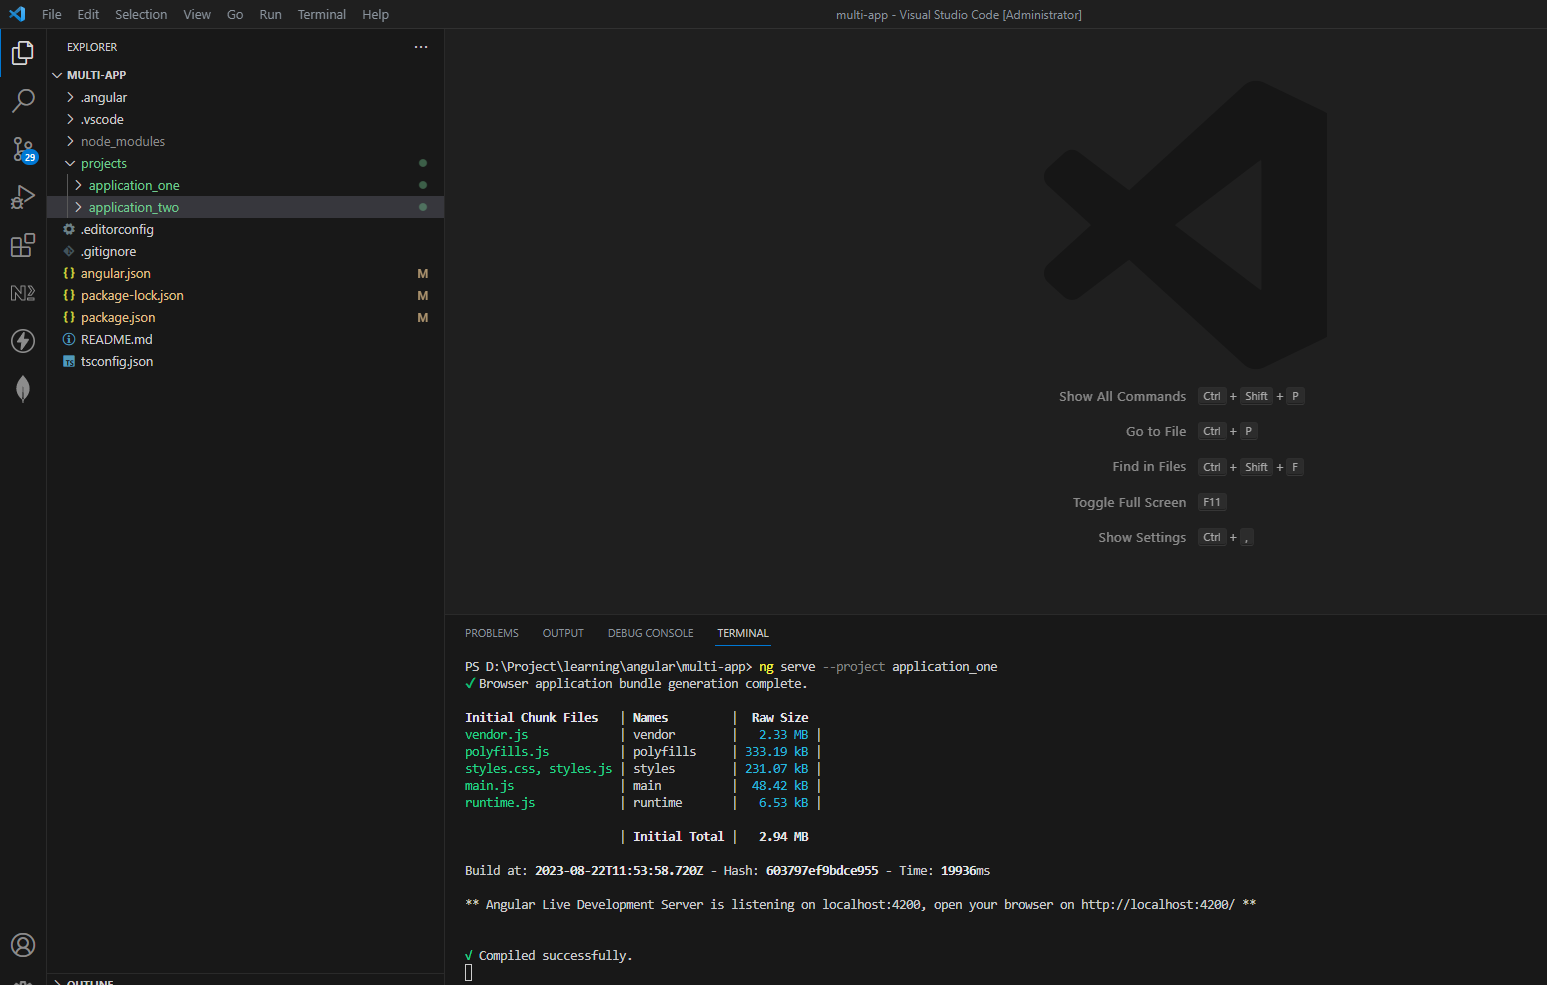
4) Serve multi – application :
We can serve application using two ways like below :
- Run ng serve <application_name>command
- Run ng serve –project <application_name>command
Using above commands we can serve any of the angular projects from our work spaces.
We also have one option for setting default applications in angular.json. That is to serve the default application to us when we serve the work space. For that we need to set the default project name with the deafultProject key in the project object in the angular.json file.
( Note: This feature is now deprecated in new angular version so, It doesn’t work now )
5) Create build of multi – application :
Building of these multi application structures is the same as serving the app. Only difference is we need to pass build command instead of the serve command and also we need to set environment configuration inside the angular.json file for specific applications.
We can create build of application using two ways like below :
- Run ng build <application_name>command
- Run ng build –project <application_name>command
Build command creates the multiple application dist folder inside the dist folder of the project workspace.
If we need to change the environment configuration then we can set it from the project object configuration in angular.json for the specific project.
Create a library along with applications in the same workspace :
Using the ng generate library <library_name> command we can create a library along with an angular application in the workspace. This command will create a lib folder inside the projects folder.
After building or publishing this library we can use it in any of the applications in our project. We can create a dist of the library using the same command of build that we have run with the application only we need to pass library name in place of project name.
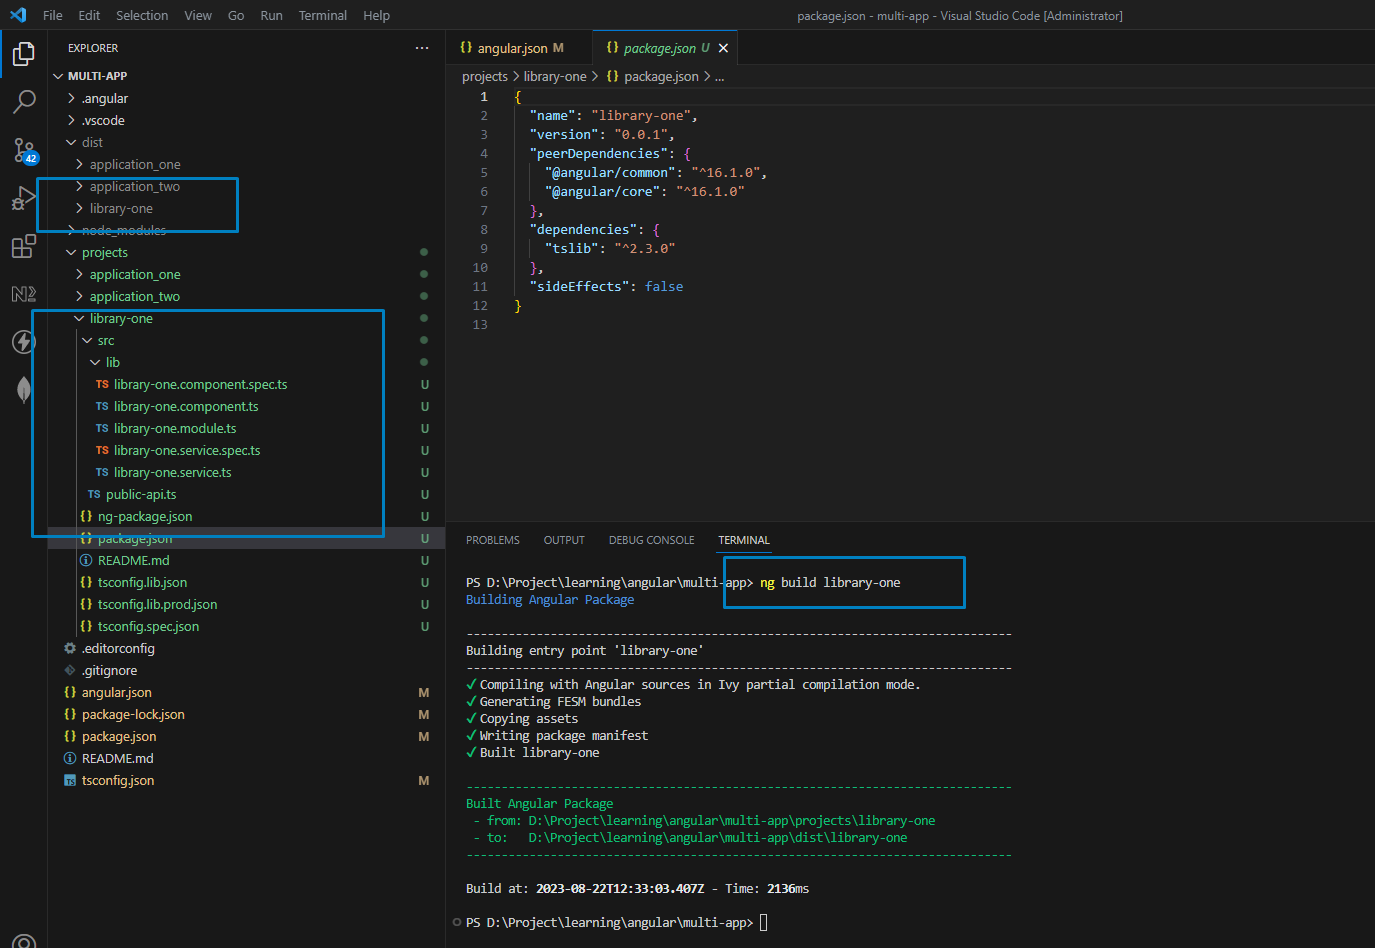
Build command creates a separate library dist folder inside the dist of the workspace along with application projects dist. After creating a library dist we can publish that library.
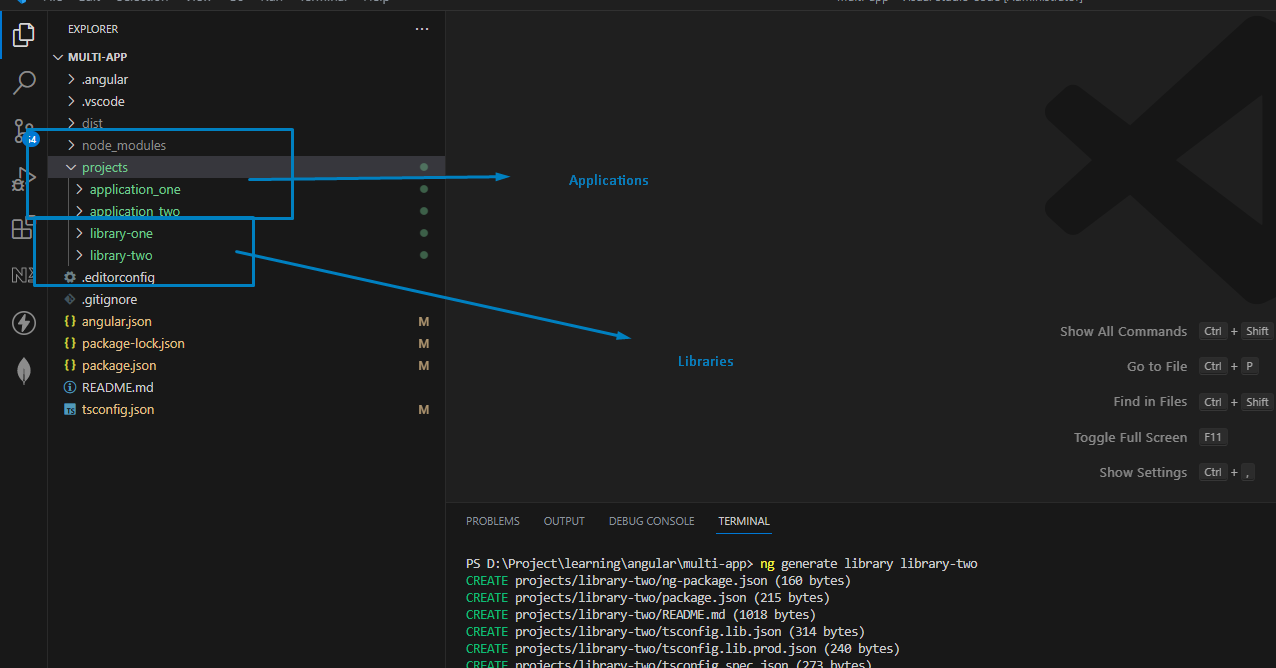
We can also create multiple libraries in this workspace. It will create multiple library folders the same as multiple applications in the workspace.
Generate component, service or any file that generated by the CLI :
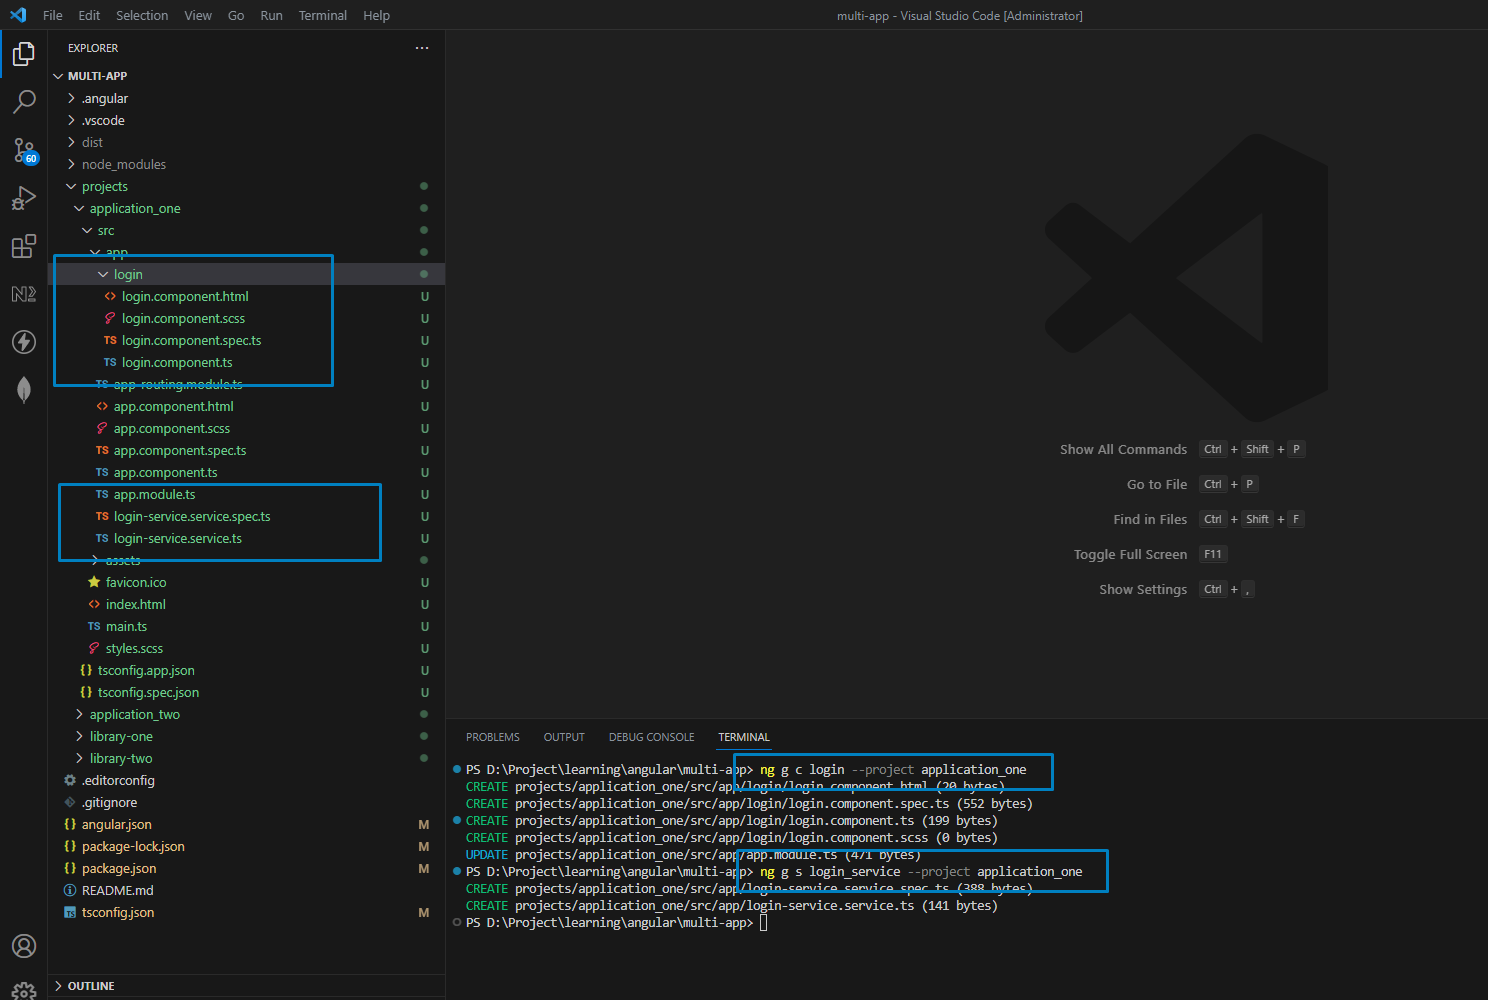
Let’s create components inside a project using CLI. Command for generating CLI is the same as the previous, only we need to add a check that we need to generate components in which project.
Command for create component using CLI like below :
ng generate component <component_name> –project <project_name>
Command for create service using CLI like below :
ng generate service <service_name> –project <service_name>
Above commands are the same as the normal generated command of CLI but, the only difference is that we need to pass – -project flag to tell our workspace to generate a file in that specific project.
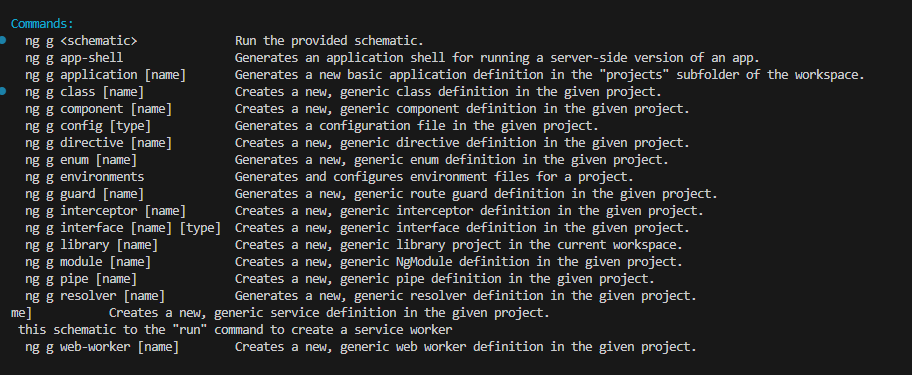
Using this angular generated CLI command we can generate any of the files or configurations that are available in the above screen-shot. Only we need to tell our workspace about where that file needs to be generated. We can tell us to our workspace by passing – -project flag with generate command.
After the generated files structure display like below screen-shot.
What is micro service based architecture?
Above examples we have seen how monolithic architecture works in the angular. In the past, have also seen how Angular can be used for Office Add-in development to get an idea about its significance. Now, let’s see what microservice-based architecture is about and how we can implement the microservice-based architecture in angular.
In the microservice-based architecture, we can create separate libraries that we can use in our main application. Libraries have their own dependencies, their own UI and functionality. So, we only need to use those libraries in our main application after publishing it on npm.
This architecture is beneficial when you are working with teams, so that time we can divide that service for development to each team member.
How to implement micro service based architecture in this project structure?
See below screen-shots, we have created two libraries for authentication and user modules that we can use in our main application.
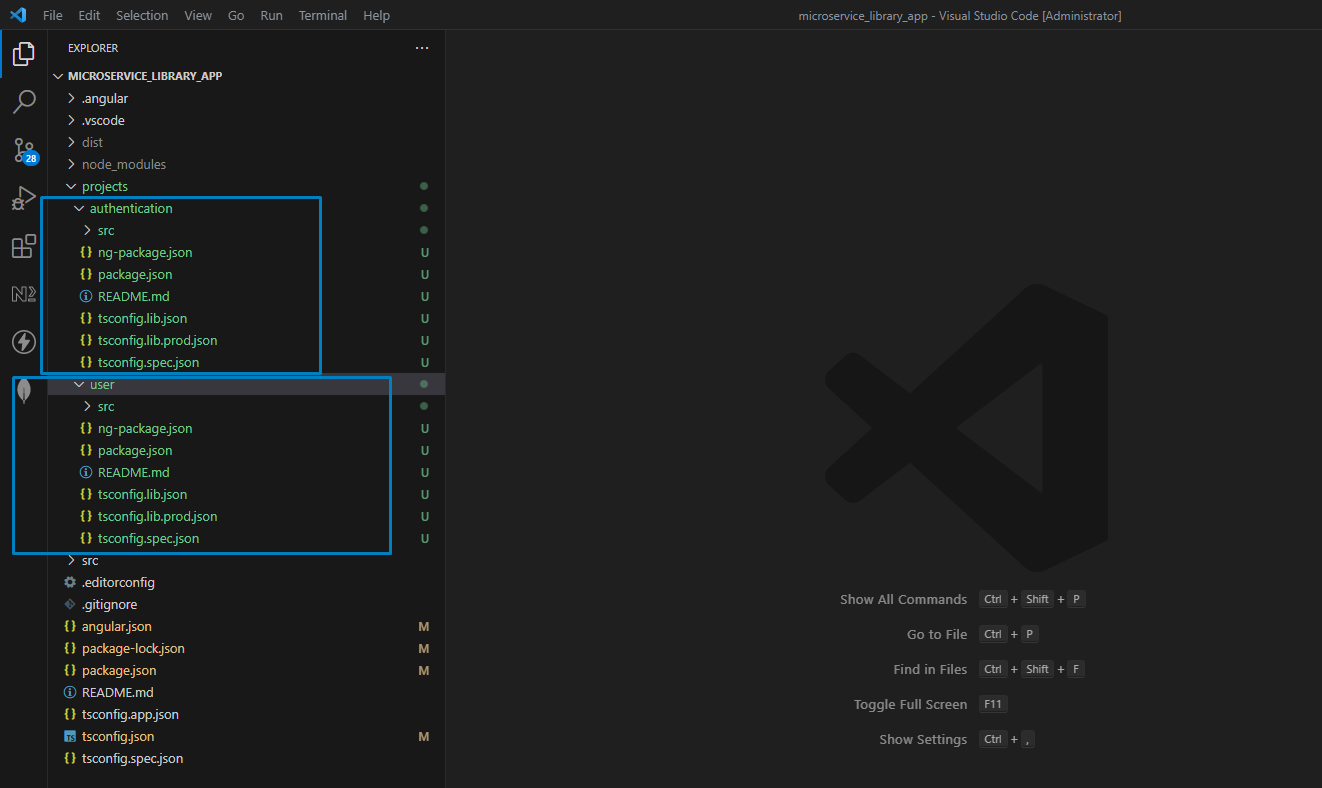
We have created it using the ng generate library <library_name> CLI command.
After implementing all the functionalities in those libraries we need to upload that on the npm registry for use in our main application. For the testing purpose you can use Verdaccio, that tool is a lightweight Node.js private proxy registry. We can use the same as npm but, the only thing is that we can push our library locally.
Conclusion:
To summarize, we have gone through the following concepts:
- We have seen why we use multiple application structures in the single workspace. We have checked the uses and benefits of the multiple applications.
- We have seen how our application is helpful from a business perspective.
- We went through the steps of the creation of the multiple applications. We went through build creation, serving multiple application scenarios also.
- Discussed how we create multiple libraries along with applications. Also seen how to create a build of a specific library.
- We went through the steps to generate all other files that were generated by the angular CLI.
I hope it will help you understand the Power of Angular in Multiple application development with a single workspace.